How to Properly Install Drywall for a Flawless Finish in 2025
Installing drywall is a vital part of achieving a polished home interior and it can seem daunting without proper guidance. This article provides a comprehensive drywall installation guide to help homeowners and DIY enthusiasts learn how to install drywall effectively. From the best techniques to essential tools, we will ensure your project creates a professional-looking finish that stands the test of time. Let’s dive into the world of drywall and make your project a success!
Understanding Drywall Types and Uses
Before you start installing drywall, it’s crucial to understand the different types available and their specific uses. The most common types of drywall include standard, moisture-resistant, and fire-rated drywall. Standard drywall, often termed as regular whiteboard, is suitable for most interior walls and ceilings, while moisture-resistant drywall is ideal for use in areas prone to dampness, like bathrooms. Fire-rated drywall is specifically designed to resist burning and is often required in shared walls between residences. Knowing the right drywall types can play a significant role in your drywall insulation installation and overall home safety.
Choosing the Right Drywall for Your Needs
Selecting the appropriate drywall for your project involves assessing both functionality and location. For example, if you’re installing drywall in a basement, moisture-resistant drywall will prevent mold and mildew from developing. Consider also if you want soundproof drywall, particularly in shared living environments. Additionally, when discussing drywall types and uses, ensure you assess the thickness of the panels as this affects durability and insulation qualities. A common choice is ½-inch panels for most interior applications while 5/8-inch is preferred for ceilings to guard against sagging.
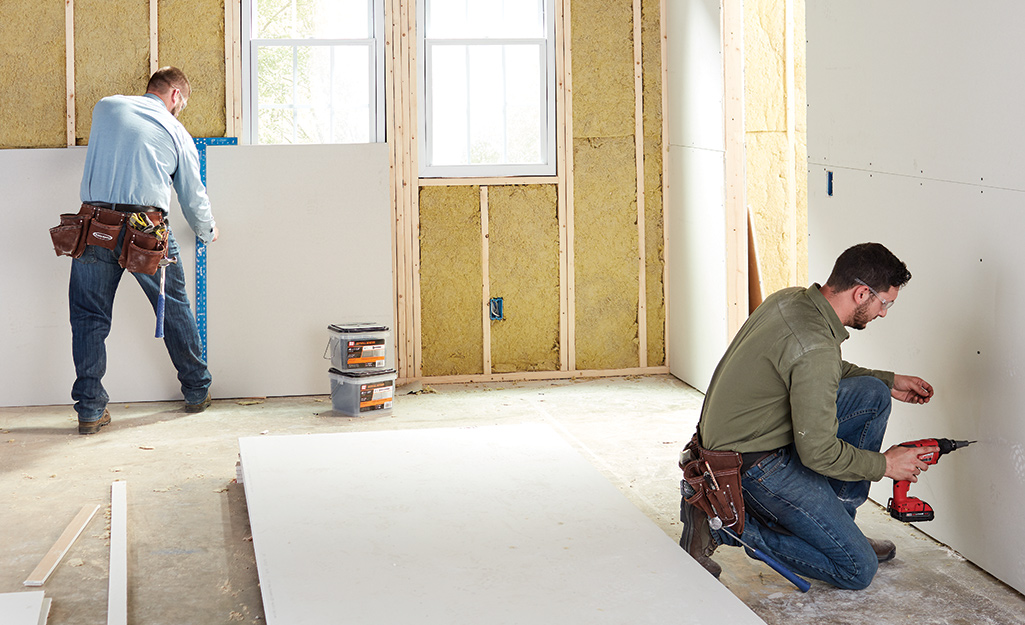
Drywall Installation Materials and Equipment
A successful drywall installation heavily relies on selecting the right materials and equipment. Tools you will need include a utility knife for cutting, a T-square for accurate measurements, drywall screws vs nails (screws are preferred for their holding power), and taping tools for finishes. Hardware like corner beads and joint tape specifically aid in achieving a flawless finish. Creating a drywall supplies list prior to purchase will not only streamline the shopping process but also ensure you have everything in one go, thereby minimizing project interruptions.
Step-by-Step Guide to Drywall Installation
Installing drywall doesn’t have to be a daunting task. Following a systematic approach significantly simplifies the process. Start by measuring your walls and determining the number of panels needed; drywall measuring tips can greatly enhance this step. Aim for a full panel layout to reduce seams and promote strength in each installed section. Next, make precise cuts using your utility knife and T-square. Finally, secure the panels to the studs using drywall screws, ensuring they are embedded slightly below the surface without breaking the paper.
Drywall Hanging Techniques
Employing the right drywall hanging techniques will contribute greatly to the victory of your project. Always start hanging drywall on the ceiling, as it’s easier to keep panels from sagging. Use a drywall lift for ceilings to alleviate the weight on your arms and back. Remember to stagger your seams; this increases structural integrity and reduces potential cracking. Also, make sure to stagger your fasteners to keep stress points minimal which can dramatically improve long-term performance.
Drywall Panel Installation Best Practices
Adhering to best practices during drywall panel installation ensures a smoother process and superior finish. Begin by installing boards horizontally, leaving a small gap at the bottom for expansion and contraction. This is crucial for maintaining integrity over time. When fastening panels, place screws every 12 inches along the outer edges and every 16 inches centrally, minimizing the risk of movement. Additionally, proper alignment at the seams will reduce the need for excessive mudding and finishing work later on.
Finishing Drywall: Techniques and Tips
Once you have installed your drywall panels, the finishing stage is where the magic happens. Effective drywall finishing techniques, including taping and applying joint compound, beautify and prepare your walls for painting. For a perfect surface, apply the first coat of joint compound using a wide knife, feathering it out across the seams.
Drywall Taping and Mudding Techniques
Drywall joint taping is a critical step in the finish process. Applying the right amount of joint compound over tape provides a seamless appearance. Use a corner knife for the internal corners which allows a neat finish. Give it ample time to dry before sanding down to smooth the surface. Sanding can often be intimidating, but with proper drywall sanding tips, you’ll achieve a flawless finish without damaging the surface. Always sand with the grain and wear a mask to avoid inhaling dust particles.
Drywall Corner Finishing Techniques
For impeccable corner finishing, use metal corner beads, ensuring a sharp edge that remains resilient during wear and tear. Measure accurately before cutting your beads, and fasten them securely with screws. Cover them with joint compound for an evened-out finish. Proper finishing around the corners reduces the likelihood of chipping and enhances aesthetic appeal.
Common Drywall Installation Mistakes to Avoid
Even seasoned installers can make mistakes during drywall installation. Common drywall installation mistakes include mismeasuring and hastily applying screws causing a cement layer to crack or break. One must understand how to safely cut drywall edges as improper handling can lead to breaks. Always ensure safety by wearing protective gear and staying safe from falling debris.
Understanding Drywall Installation Standards
Familiarizing oneself with drywall installation standards prevents compliance-related issues in the future. Most regions have specific local building codes regarding drywall thickness, fastening, and finishing that must be adhered to for inspections. Make sure to check local regulations, as well as national standards set by organizations like the Gypsum Association before completing your project.
Benefits of Hiring a Drywall Installation Contractor
For those hesitant about embarking on their installation journey, hiring a qualified drywall installation contractor can alleviate your stress. Professionals not only provide faster installation but also access to advanced techniques ensuring superior results. They can effortlessly navigate potential pitfalls related to insulation installation and finishing while ensuring your projects meet required standards.
Key Takeaways
- Understanding different drywall types is essential for successful installation.
- Follow a systematic step-by-step process for hanging and finishing drywall.
- Avoid common mistakes by adhering to standard practices and using the right tools.
- Consider hiring professional contractors for large projects or complex installation.
FAQ
1. What are the most common drywall types?
The most commonly used drywall types include standard ‘regular’ drywall, moisture-resistant drywall, and fire-rated drywall. Each type has its specific application based on where it will be installed, with moisture-resistant drywall being ideal for wet areas while fire-rated types are utilized in shared walls for safety.
2. What tools are essential for drywall installation?
Essential tools for drywall installation include a utility knife, T-square, drywall screws (or nails), a screw gun, taping knives, and a drywall lift. These tools simplify the measurements, hanging, and finishing processes ensuring a professional finish.
3. How can I avoid drywall installation mistakes?
To avoid common drywall installation mistakes, ensure accurate measurements, use the right type of drywall for your space, and be meticulous when hanging and finishing. Following best practices and utilizing reliable tools is also key to minimizing errors.
4. What are drywall safety precautions I should adhere to?
When installing drywall, ensure that you wear safety goggles to protect eyes from dust and debris. Use a dust mask during sanding to avoid inhalation of particles, and always lift panels carefully to prevent back injuries.
5. Is professional drywall installation worth the cost?
Yes, hiring a professional drywall installation contractor can save you time and effort, ensuring that all aspects adhere to local building codes. Professionals possess the expertise to execute complex jobs efficiently while delivering a flawless final product.